In this article you will learn how to configure your Midi Fighter Twister inside the most popular free and paid applications. You can click on the following links to jump to that software directly.
DJ Software
Music Production Software
DJ Software
Virtual DJ
-Available platforms: Mac, PC.
-Plugin support: Yes.
-Price: $19 per month, or $299 for lifetime.
-Virtual DJ is truly the most capable DJ software in the world. Midi Fighter Twister works natively with Virtual DJ 8.5 and newer versions! The built-in mapping for Midi Fighter Twister offers you the access to Effect parameters, Full Stems, Pads Controls and Instant Gratification Effects.
Installation Guide:
The hardware manual and controller layouts can be found here.
Djay Pro AI
-Available platforms: iOS, macOS, Windows, Android.
-Plugin support: No.
-Price: $6.99 per month, or $49.99 per year.
-djay provides a complete DJ software for all DJs. The DJ software seamlessly integrates with your music library, giving you instant access to millions of tracks. You can perform live, record mixes on-the-go, or enable Automix mode. djay is the perfect DJ software for casual and mobile DJs, while djay Pro is a DJ software designed for professional DJs. Use your Midi Fighter 3D to trigger cue points, loops, pad FX and samples with DJ TechTool's own Midi Fighter Twister mapping.
https://www.algoriddim.com/djay-pro-mac
The Installation Guide and more info about the mapping can be found in the following link.
https://techtools.zendesk.com/hc/en-us/articles/360050523612
Zenbeats
-Available platforms: iOS, macOS, Windows, Android.
-Plugin support: Not supported in free version.
-Price: Free.
-Roland Zenbeats is a music creation app that keeps you in an effortless artistic flow. Get started on any mobile device or computer platform and make music anywhere, anytime. With its collection of both modern and legendary sounds, Zenbeats brings Roland’s history of innovation into a new, mobile-friendly format.
https://www.roland.com/us/products/rc_zenbeats/
Installation Guide:
1 - Connect your Midi Fighter Twister using provided USB cable and start Midi Fighter Utility. Ensure that you set rotary to CC type (absolute message, not relative) and then click on "Send to Midifighter" to apply new settings to the device.
Note: If you are running Windows on your computer, be sure to close the Utility at this point because Windows doesn't allow to connect a single controller port across multiple applications.
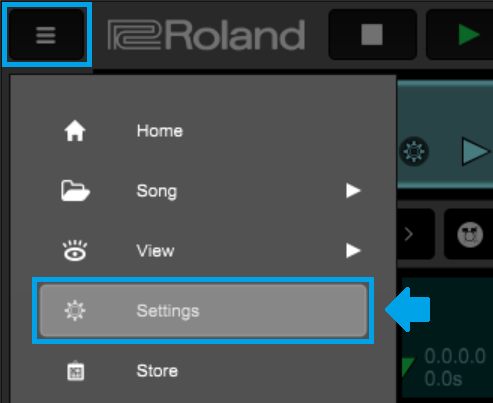
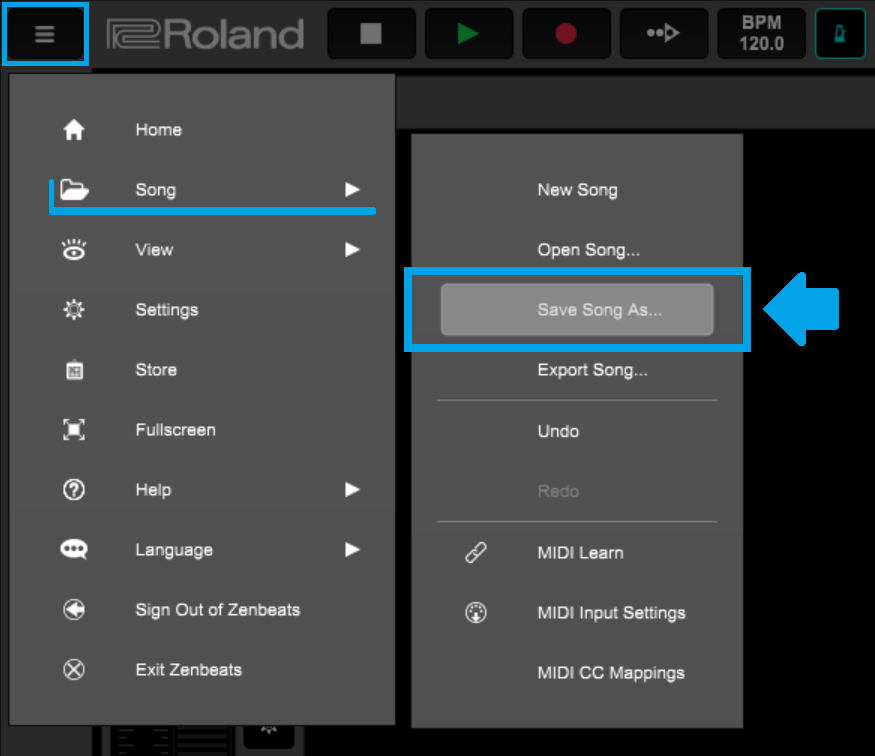
2 - Start Zenbeats. Click on the menu bar and navigate to Settings tab.
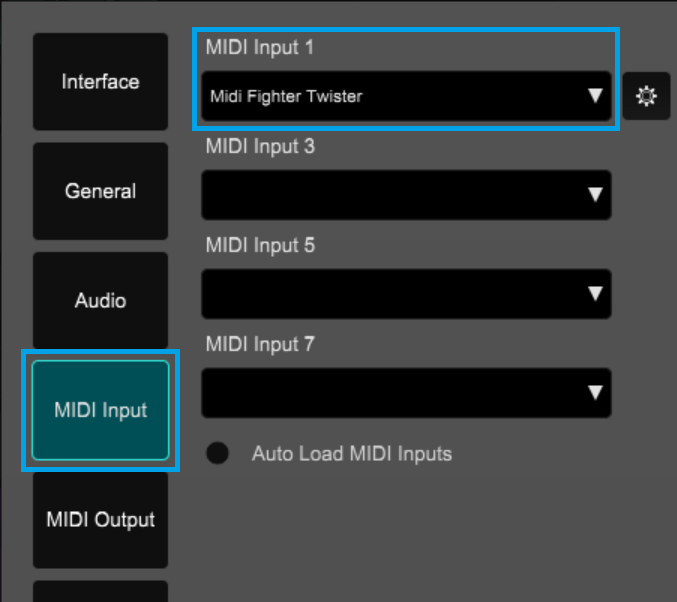
3 - Inside Settings, select "MIDI Input" category and assign Midi Fighter Twister at "MIDI Input 1" drop menu.
4 - Next, select "MIDI Output" category and also assign Midi Fighter Twister at "MIDI Output 1" drop menu.

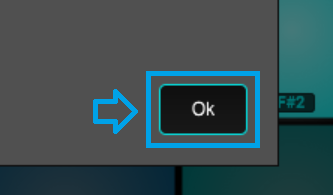
5 - Cick on "OK" in the lower-right corner of the Preferences window to apply the new settings to the software.
6 - Click on "Mixer" button in the lower-left side corner to toogle the mixer section On.
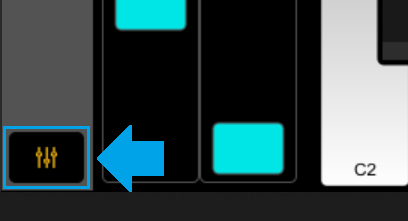
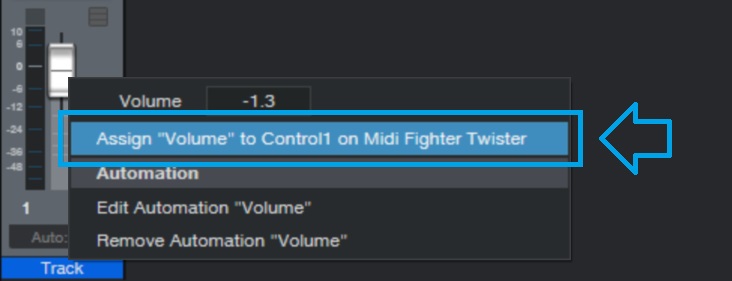
7 - Right-click on the Track Volume fader and select "MIDI Learn" option.

8 - Turn an encoder on Twister to apply the rotary CC and start controlling the volume fader.

Repeat steps 6 and 7 for each fader or button that you wish to Midi map.
9 - Mappings are saved in a form of a Song (project). Ensure to save any changes you make before closing the app.
Bonus tip: It is also possible to use Twister's built in sequencer to trigger sounds!
MPC Beats
-Available platforms: macOS, Windows.
-Plugin support: Yes.
-Price: Free.
-MPC Beats is the free beat making software DAW with Drum Programming, Sampling and Audio Recording built on the legendary MPC music production hardware. While the Twister works as a general midi controller and send notes to a drums or an instruments out of the box it is also possible to MIDI assign functions and turn your Midi Fighter Twister into the controller surface and trigger software functions.
https://www.akaipro.com/mpc-beats
Installation Guide:
1 - Connect your Midi Fighter Twister using provided USB cable and start Midi Fighter Utility. Ensure that you set rotary to CC type (absolute message, not relative) and then click on "Send to Midifighter" to apply new settings to the device.
Note: If you are running Windows on your computer, be sure to close the Utility at this point because Windows doesn't allow to connect a single controller port across multiple applications.
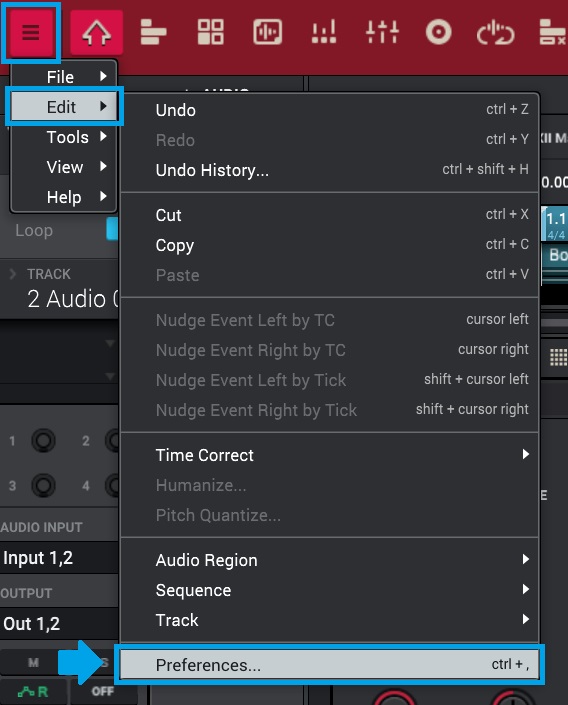
2 - Start MPC Beats and open the Preferences window. Click on the menu bar and navigate Edit --> Preferences.
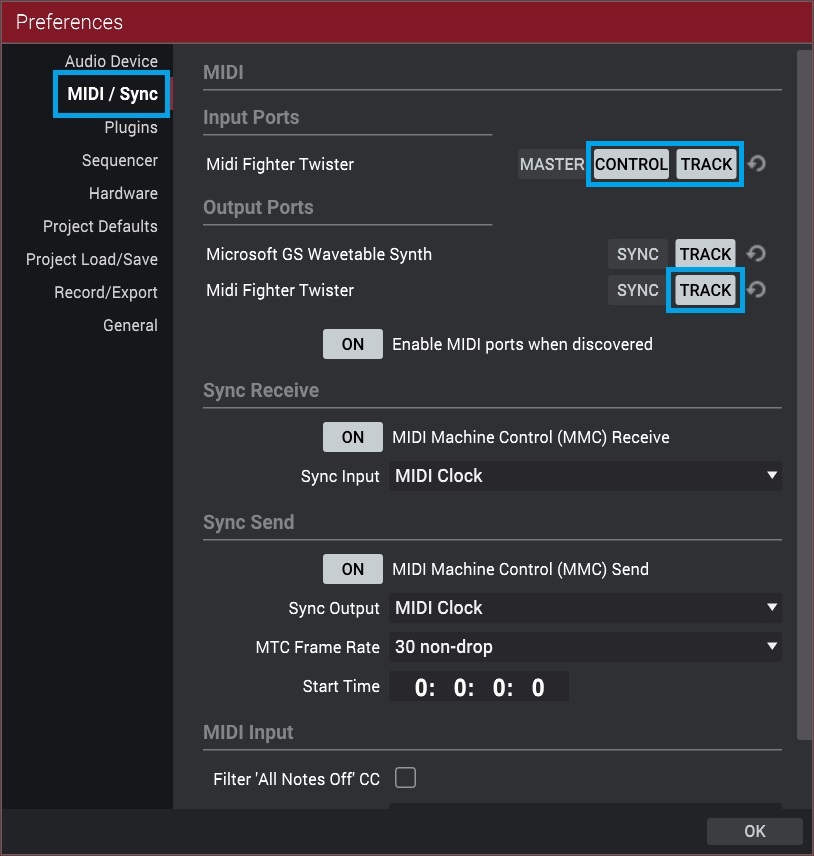
3 - Inside Preferences, click on "MIDI / Sync" tab and enable Midi Fighter Twister ports by activating the "CONTROL" + "TRACK" setting at Input Port and "TRACK" setting at Output Port.
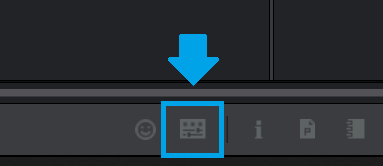
4 - Click on "MDI Learn" button in the bottom of the screen or press "Ctrl+Shift+L" to open the mapping interface.
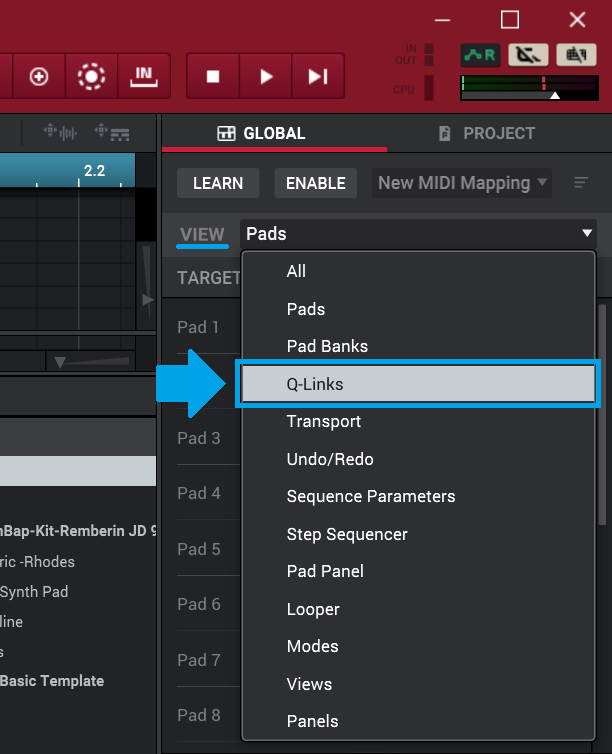
5 - Inside the mapping interface, click on "VIEW" menu and select "Q-Links" in drop-down. In this tutorial we will assign first Q-Link knob to an encoder on your Twister.
6 - Click on "LEARN" button and all mappable controls will become highlighted. If not selected automatically, click on Q-Link 1 Knob to assign it.

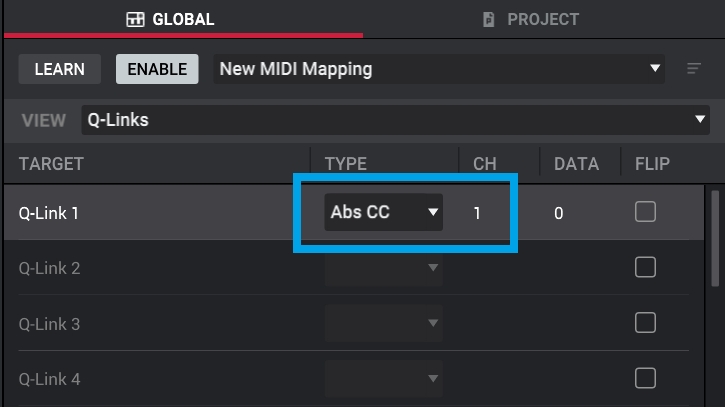
7 - Turn an encoder on your Twister and the assignment will appear in the mapping interface for the Q-Link 1.
8 - Disable the "LEARN" button and test the results.

9 - Enable "SYNC" + "TRACK" buttons on the Output Port for Midi Fighter Twister.

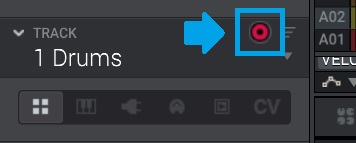
10 - Arm a MIDI Track where you have your sounds loaded and then trigger notes to play them.
Bonus tips: It is also possible to use Twister's built in sequencer to triger sounds!
11 - Press both center side buttons simultaneously on your Twister to enter the sequencer page.
12 - Press play in software and press the right-upper side button to start the sequencer and start editing your patterns.
Reaper
-Available platforms: macOS, Windows, Linux.
-Plugin support: Yes.
-Price: Free Evaluation version, or $60 for lifetime.
-Reaper is a great DAW for beginners. Its logical layout and excellent available video tutorials make it easy to learn. Although fully featured, it is easy to use without using advanced features. Reaper's low price, renowned stability, and low computing requirements make it an ideal first DAW. Use your Midi fighter Twister to trigger software drums and instruments.
Installation Guide:
We made a simple mapping for Twister to help you get started inside Reaper. Check it out on DJTT Midimaps section.
https://maps.djtechtools.com/mappings/12687
Komplete Start
-Available platforms: macOS, Windows.
-Plugin support: Yes.
-Price: Free.
-Step into music production with KOMPLETE START – a curated selection of studio-quality instruments, effects, utilities, loops, and samples. Play over 2,000 customizable sounds – drums and percussion, bass, acoustic instruments, synths, pads and atmospheres, effects, and more.
https://www.native-instruments.com/en/products/komplete/bundles/komplete-start/
Installation Guide.
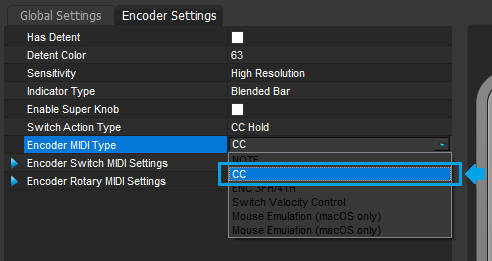
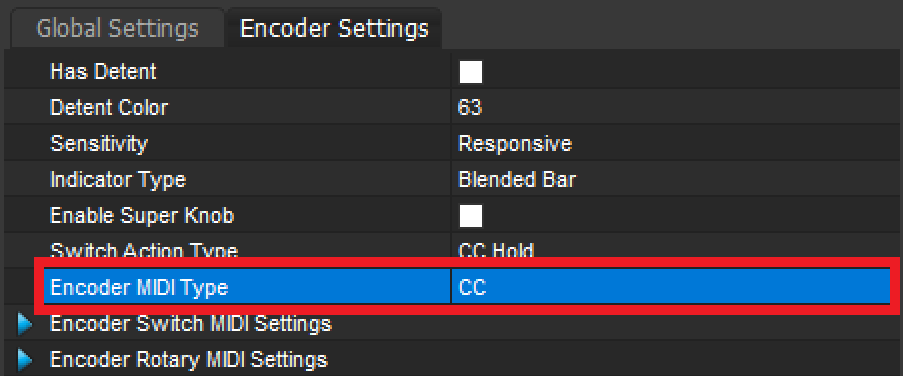
1 - Start Midi Fighter Utility and make sure that your encoder are configured to "CC MIDI Type" as the following image illustrates and don't forget to send new settings to Midifighter.
2 - Head over to Native Instruments website and download and install the Native Access application. It is a HUB for all NI software products.
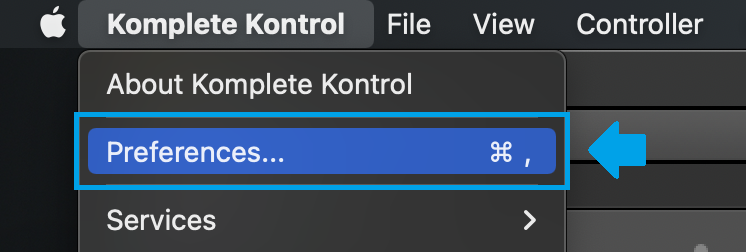
3 - Once it is installed, start Komplete and open it's Preferences window. Komplete Kontrol --> Preferences.
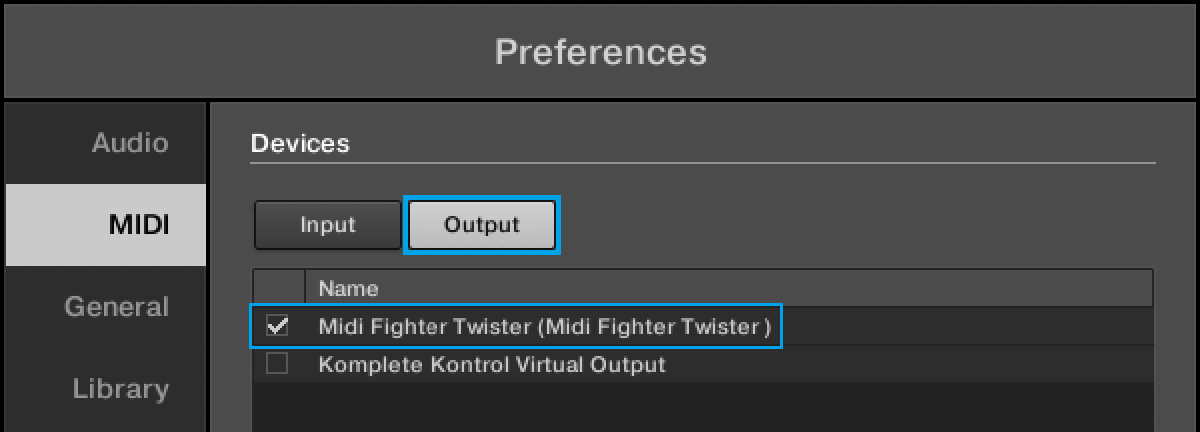
4 - Select "MIDI" category on the left and then click on "Input" tab and check the box next to Midi Fighter Twister.
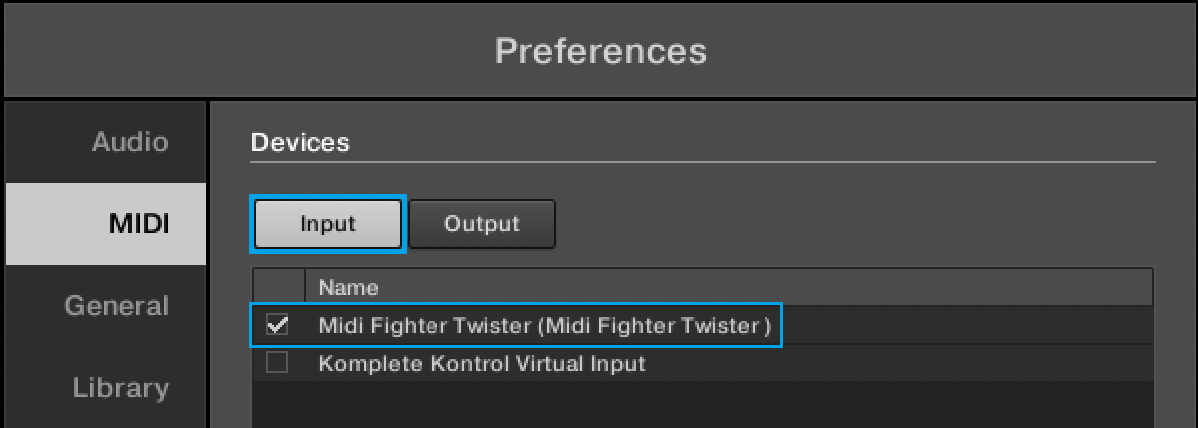
5 - Click on "Output" tab and check the box next to Midi Fighter Twister.
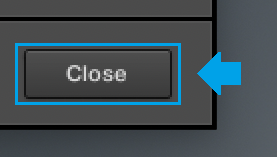
6 - Close the Preferences and start MIDI mapping.
7 - With Twister connected, click on "View" and enable "MIDI Learn" mode in the drop-down menu. You can also use key "M" on your computer keyboard as a toggle hotkey for this.
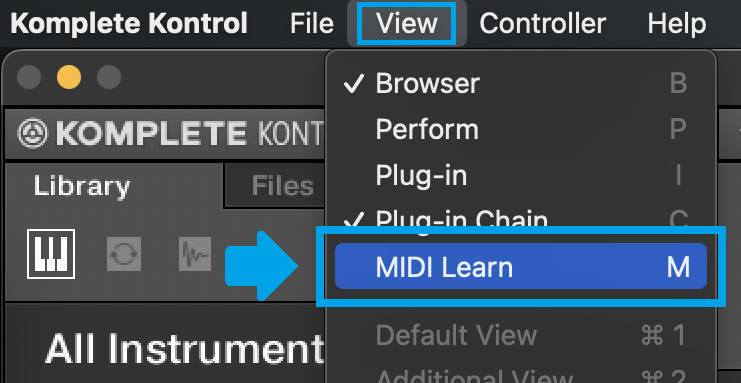
Once it is enabled, you will see all available global MIDI Knobs or Buttons controls on screen.
8 - Click on "Knob 1" (if not selected automatically). It will become highlighted and ready to be assigned to Twister!
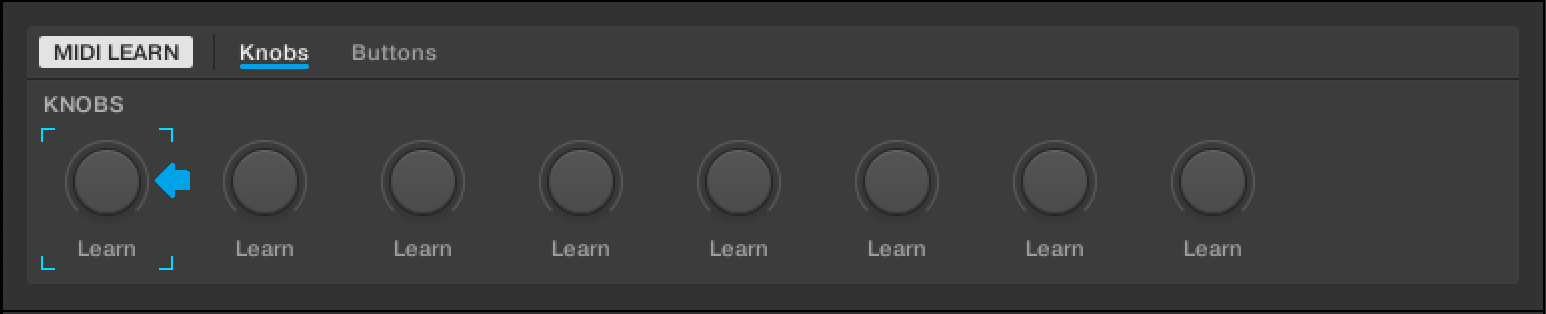
9 - Turn an encoder in Twister and observe the "Knob 1" on the screen. You should see the specific CC number appears.

10 - Press "M" again on your computer keyboard to stop the MIDI Learn mode.
If done correctly, this encoder will control the Parameter 1 in any selected pluigin. Repeat the mapping process for each encoder or button that you need the access to.
FL Studio
-Available platforms: macOS, Windows.
-Plugin support: Yes.
-Price: $99 to $499 for lifetime.
-FL Studio is the result of over 20 years of continuous development, to become the fastest way from your brain to your speakers. Many of the world's top DJs and producers started by downloading the FL Studio trial, making their first beats in a bedroom studio. The LF Studio trial allows you to make and save projects, then export them to audio formats like MP3 and WAV, ready to share with the world.
Installation Guide:
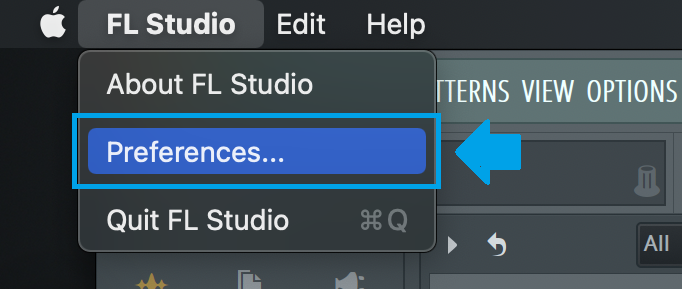
1 - Click on "FL Studio" and navigate to "Preferences" in the drop menu.
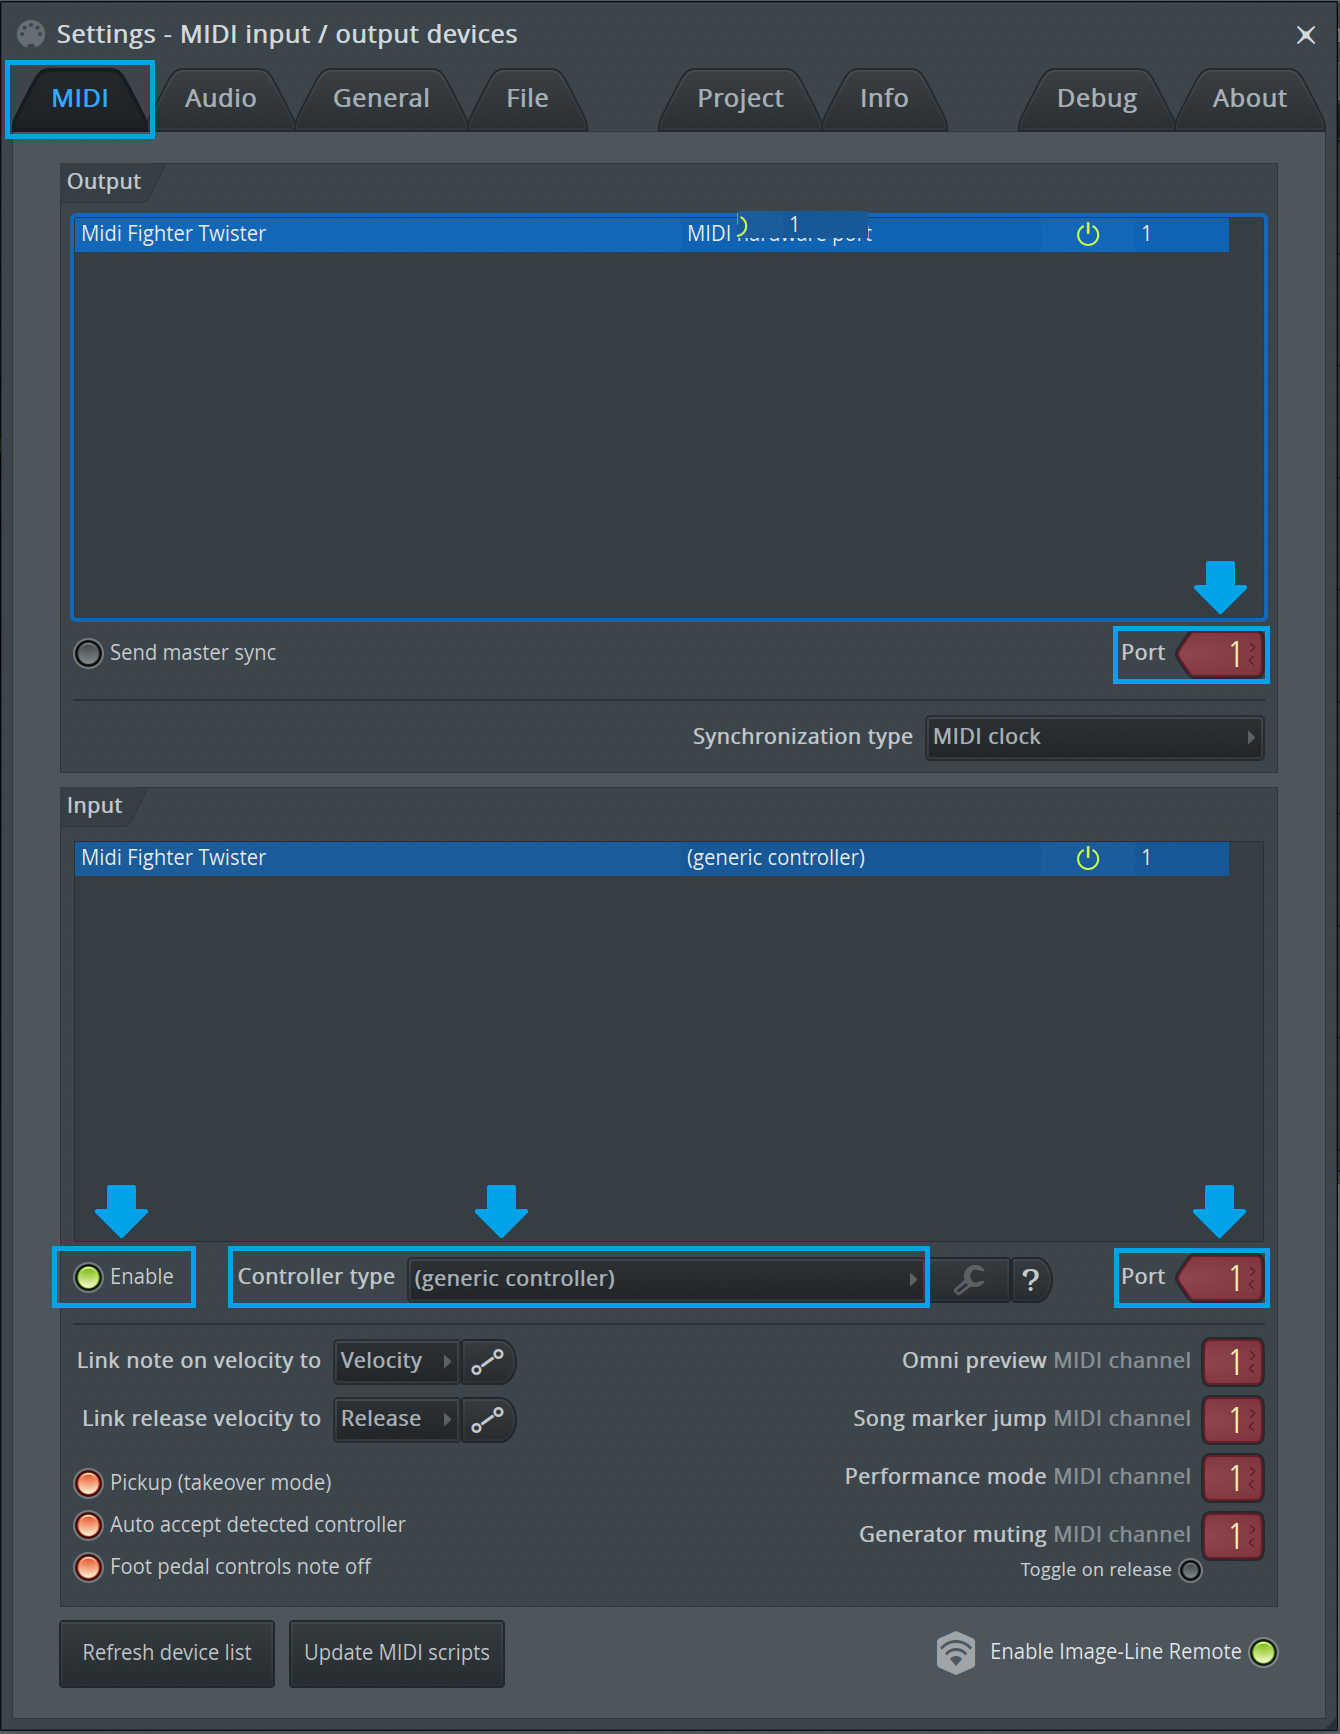
2 - Inside Preferences, select "MIDI" category and observe the Output and Input section. The Midi Fighter Twister should be displayed in both sections. Ensure to configure the same settings as the following image illustrates.
3 - Close Preferences window and start MIDI mapping.
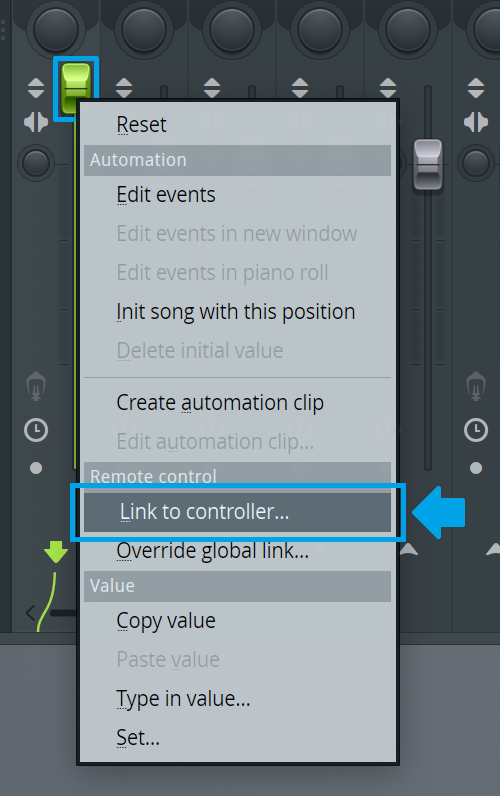
4 - Right-click on the software parameter that you wish to assign and select "Link to controller..." option. We will use the Track Volume in this simple tutorial.
5 - Turn an encoder on Twister. This action will close the mapping window and you will see that FL Studio receive MIDI signal and that the parameter is working. However, if you try to adjust the same parameter using a mouse then you will notice that the LED ring indicator on Twister is not automatically updating the value of that parameter (position). This is FL Studio software limitation.
In case that you would like to assign a single encoder to a multiple parameters and seamlessly switch between them then use Twisters 4 banks that you can assign to side buttons in the Midi Fighter Utility. Switching between different mappings with Midifighter Banks will bypass the FL Studio limitation mentioned.
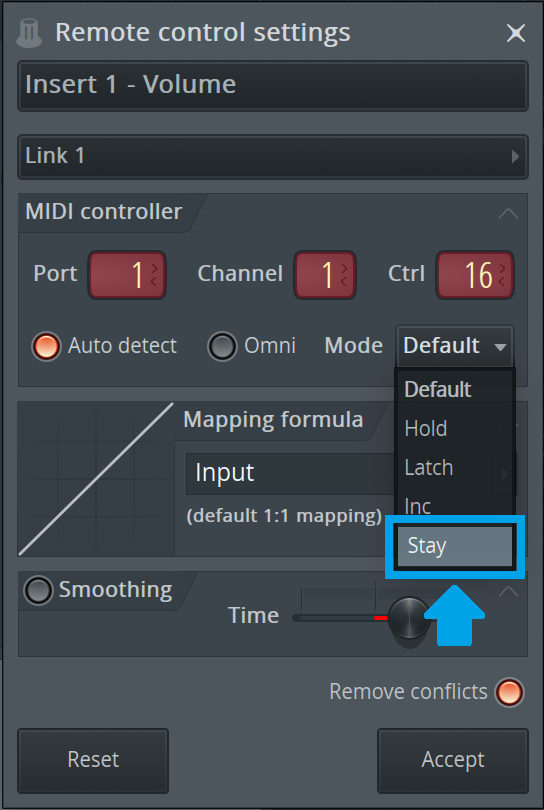
6 - Is optional and allows for "Soft Takeover" control. Right-click on the same parameter once again and also select "Link to controller..." option to bring the mapping interface window back in view. Then select "Stay" as an encoder mode and finally click on "Accept" button.
-Available platforms: macOS, Windows.
-Plugin support: Yes.
-Price: Free after full 30-day Demo version expires.
-Studio One Prime provides everything you need to get started in content creation and audio production for the low, low cost of $0 USD. Create your own music and podcasts as intuitively as possible with a single-window, drag-and-drop workflow that will make you wonder why you put up with other software that isn’t designed the same way.
https://shop.presonus.com/Studio-One-5-Prime
Installation Guide:
1 - Connect your Midi Fighter Twister using provided USB cable and start Midi Fighter Utility. Ensure that you set rotary to CC type (absolute message, not relative) and then click on "Send to Midifighter" to apply new settings to the device.
Note: If you are running Windows on your computer, be sure to close the Utility at this point because Windows doesn't allow to connect a single controller port across multiple applications.
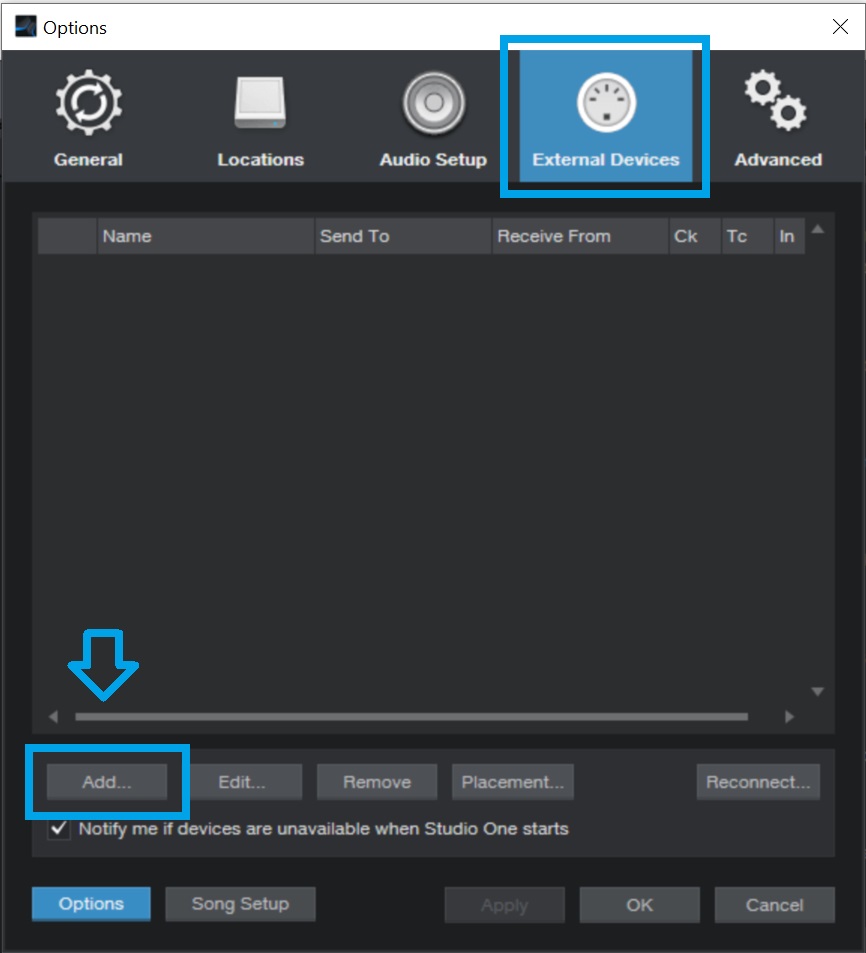
2 - Start Studio One 5 Prime. Click on the "Options" tab.

3 - Inside the "Options" select "External Devices" and then click on "Add..." button to add new device.
4 - Next window will appear in which you create the controller surface and rename it to "Midi Fighter Twister".

5 - Ensure that both "Receive From" and "Send To" ports are assigned to "Midi Fighter Twister". Then click on OK.
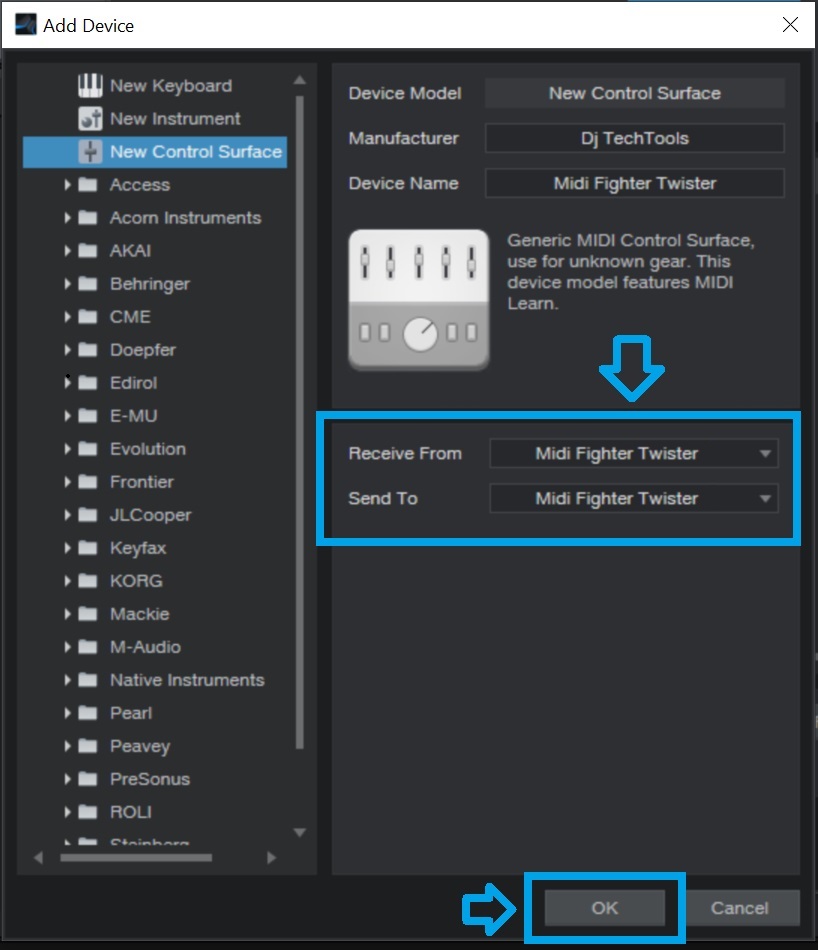
6 - Observe your device - it should look like the following image illustrates. Then click on OK to close Options window and proceed to MIDI learn.

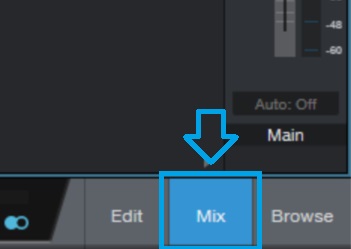
7 - Click on the "Mix" button in the lower-right corner of the application to open Mixer section.
8 - Click on "External" button in the lower-left corner of the application to open the External Devices section.
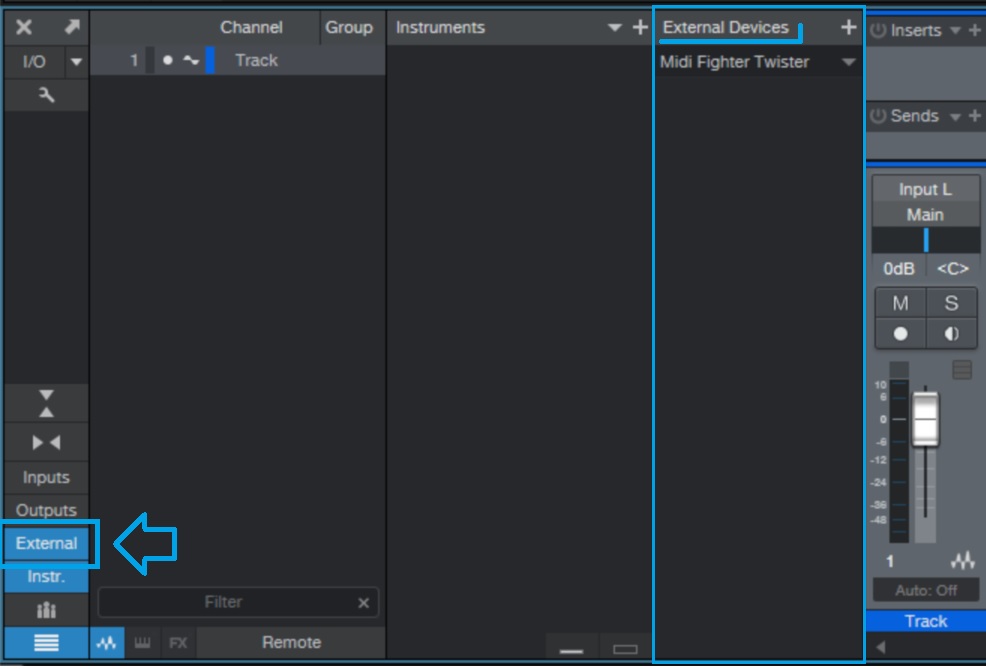
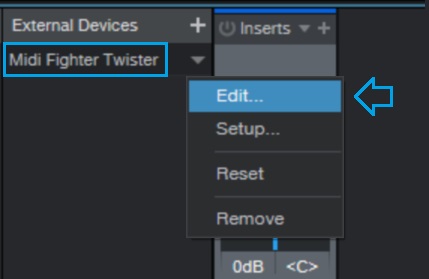
9 - Inside external devices you will see "Midi fighter Twister". Right click on Twister device and select "Edit" to create controller inputs.
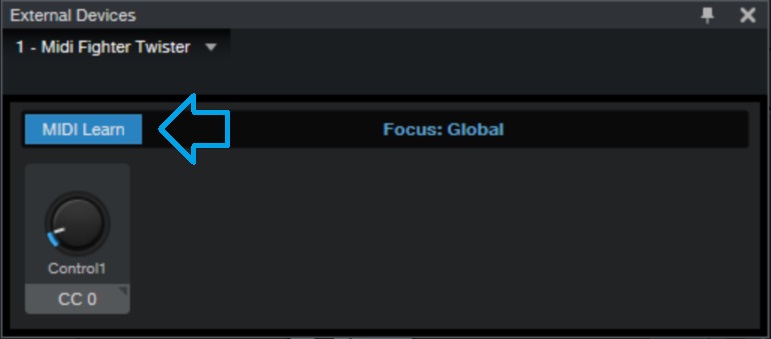
10 - The mapping interface will apear. Click on "MIDI Learn" button to enable the learn mode and then turn Encoder 1 on Twister. (In this tutorial we are using an Encoder but the same principal applies to button switches)
11- Right-click on the newly created knob and select "Transmit Value" option in the drop-down menu. This will ensure that the feedback is sent back to Misidifighter Twister LED Ring Indicator.
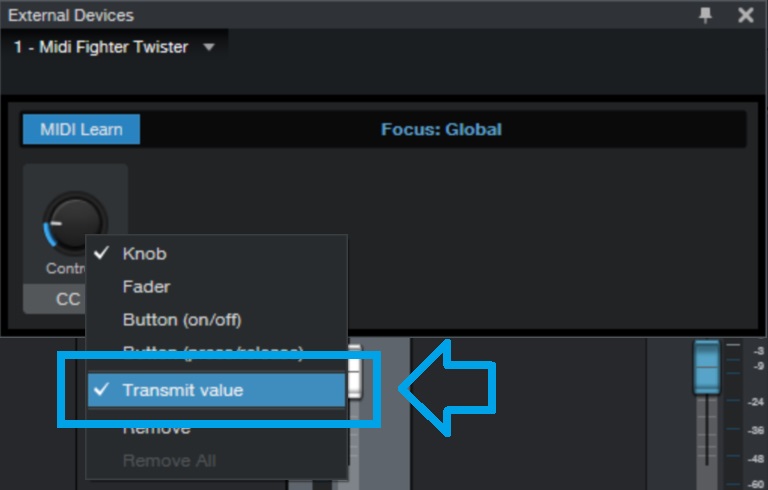
Once it is enabled. Deactivate "MIDI Learn" and close the mapping interface.
12 - Right-click on a fader in the Mixer section and select the knob you just created in the drop-down menu.
13 - Turn a knob on Twister or move a fader on the screen to test the result.
Note: Repeat steps 10, 11 and 12 for as many faders that you need in your mapping.